Blog

woocommerce-placeholder

Still.Knitting.Citron.

If you've come here looking for the Yarn Giveaway, Click Here, to be take to that post.  Leave a comment by June 30 and be entered in the drawing!

image from images4.ravelry.com

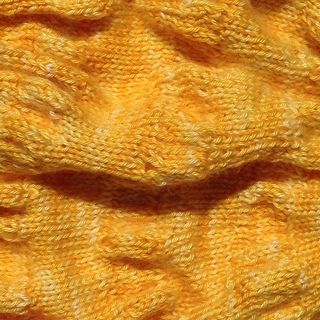
I am still knitting Citron.  I started this incredibly simple pattern on April 15, but somehow or another, I'm still plugging away at it.

In my defense, I now have 400+ stitches on the needles, and I've managed several other projects while I've had Citron in the works.  But it feels like I'm knitting in slow motion.  During the final show of VEEP last weekend, I only completed three rows.  I may be knitting Citron forever.  The picture above, of Citron midway through the fifth section, doesn't really look as though it has progressed since I was in the middle of the third repeat.  It must be a trick of the knitting.

image from images4.ravelrycache.com

It will be worth it in the end, though.  It is so lightweight and airy!  The color is so, well, lemony.  My hope is to have this finished in time for Ellie's and my annual yoga retreat, so I can toss it around my shoulders at night when we go out for our last cup of tea.  It feels like it will keep any chill away without adding any oppressive heat in summer.  And it is undeniably chic.

So Citron can have her rows of 400+ stitches.  I am resolute.  I will finish her.  I will wear her.  I will be happy, chic, and sunshiney.  I love you Citron and I'm going to conquer you!
woocommerce-placeholder

What is Your Favorite One Skein Pattern? (Blog Give Away)

Last week, I wrote about knitting small projects and enjoying the meditative value of simple knitting. So, now I'm curious: what is your favorite one skein knitting pattern?  If you tell me about your favorite pattern in the comments, you will be entered in a drawing to win yarn for your pattern choice!

Best

One skein patterns can be quick and satisfying. (Pictured above, Ellie, knitting a Cherry Branch Hat out of Elliebelly Basilisk).  Especially during the hottest part of summer, one skein knits are great projects.

In the comments below, tell me about your favorite one skein pattern.  It doesn't matter if it's written for Elliebelly yarn or not, because, patterns can be adapted to different yarns as long as the weight and drape is a good fit.  On July 1, we'll have a drawing to pick one lucky winner from the entrants.

Here are some of my other favorites one-skein projects from Ravelry knitters to get you started:

ShellBelle76 knit Malabrigo Hand Thingies in a skein of Elliebelly Coventry Cashmere.

Handthings

Angelicasays did a Rainbow Wave from Elliebelly Angel Sock.

Sedona_Wave

Squeakybeans knit some Toast armwarmers from a skein of Elliebelly Ellie-Blue Blue Faced Leicester.

Toast

What beautiful projects by a group of amazing knitters!  Post your comment below to enter the give away.  I'm looking forward to seeing what your favorite patterns are!

woocommerce-placeholder

Dyeing Yarn with Natural Dyes. Part Two.

This is Part Two of my tutorial on dyeing yarn with black beans.  Take a look at the preceding post to see the steps involved in preparation of the dyepot and the mordanting the yarn.  

We're at the stage where we are reading to dye the yarn.  Remove the beans from the liquid and skim any foam that has accumulated of the top of the liquid, the pour it into your dyeing vat. 

Photo 12

Here is our bean bath, all ready to go.  You'll notice that it is pinkish — dripping some of the color onto paper towels gives you an even better idea of what you can expect from the dyepot.

Photo 14

Since this looked a bit on the pinkish side, and I wanted to bring out the blue-green tones in the dye, I mixed a solution of soda ash and water to use in the dyebath.

Photo 13

First, I gently immersed the yarn in the dyepot.  If you want even color, you could gently move the liquid through the skeins for even coverage.  But because I wanted some light variegation, I carefully placed the skeins in the pot and ensured they were covered, but made no effort to distribute the dye.  I've got all three skeins of yarn in this one pot.

Photo 16

In a bit of dyeing magic, I poured the soda ash solution over the top of the pot and there was an instant color transition.  That process continued as the yarn soaked over the next 12 hours.

Photo 22

Here we are at the end of the dye bath, ready for removal and rinsing.

Photo 19

I very gently rinse the yarn, and then soak it in successive baths until the liquid is completely clear.  Three baths did it for this yarn, but I did a final soak in synthrapol, a dyers' soap that removes any loose dye molecules at the end of the process, before reconditioning the yarn.

Photo 23

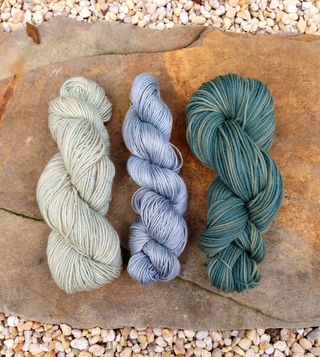
Here are my three skeins, hanging for a final bit of sun after resekeining.  

Photo 27

The skein on the left is the Malabrigo.  It's a pale green, the yarn has more color than the photo.  The middle skein is the Panda silk/bamboo blend and the skein on the right is the Pixie superwash wool. Dyeing is always a subjective process, influenced by a lot of external conditions like temperature, water ph, and concentration of dye.  But in natural dyeing, the results seem to be even more variable and very exciting.  I can't wait to knit with these skeins!

Natural dyes are notoriously migrant, meaning that the dye can fade with exposure to light and washing over time.  These skeins were well mordanted, but I'm going to do a little bit of experimentation with their light and color-fast properties to see how they do.  I hope you'll try some natural dyeing too.  Please let me know if you try it and what your results are like.  You really can't go wrong.

woocommerce-placeholder

Dyeing Yarn with Natural Dyes. Part One.

Photo 27

You will never guess.  What natural dyestuff do you think I dyed these yarns with?  It's definitely not an obvious choice, unless you've done this before, but all three of these skeins were dyed in a vat prepared from black beans.

Photo 2

Here they are, soaking in the kitchen.  I use a pot with a strainer so I don't have to fish all of the beans out after the "juice" is ready, and since this is nothing but black beans, I have none of the usual worries about working in the kitchen.  

I'll include tutorial notes on the steps I took, in case you want to dye along with me.  I eye-balled the amount of water I would need to cover my skeins, and after rinsing the dust off of the beans, covered them in water, stirred them up, and left them to soak. This batch soaked for about two and one-half days.

Photo 4

The day before I wanted to dye my yarn, I pulled it out to mordant.  The mordanting process makes it possible for the dye molecules to stick to the yarn molecules, much as in commercial wool dyeing where citric acid is used in the process.  There are a number of mordants available for use with natural dyes. Here, I'm using aluminum sulfate, which, although considered safe, means we're back to using designated dye pots and a mask for mixing.

Photo 5

We're using skeins of three different yarn bases here, because natural dyeing produces fascinating and often unpredictable results on different fibers.  On the left is a skein of Elliebelly Pixie Superwash Merino.  The middle skein is Elliebelly Panda, a 50/50 silk bamboo mix.  The final skein is undyed Malabrigo Mecha, which is a single-ply Merino, that is not superwash.

Photo 7

Here they are in the mordanting bath, with 5 tablespoons of Alum and a tablespoon of kitchen grade Cream of Tartar, which acts as a mordant/brightener.  I take close to an hour to bring the submerged yarn to a temperature where the yarn is not quite simmering.  Then, lid on but off the stove, the pot sits until the yarn is completely cool before going into the dyepot.  This is particularly important in this case, as dyeing with black beans is a cold process, and the colors gray out if heat is applied.

Photo 10

Remember to use your stove fan if dyeing in the kitchen. (With thanks to my husband for the lovely magnet that graces the hood of our stove).

Tomorrow, we'll walk through the dye bath and admire the finished yarn in Part Two.


woocommerce-placeholder

Yarn: Dyed and Overdyed

As a collage artist, I spent a lot of time layering color upon color to give a piece depth and movement.  I approach dyeing yarn the same way, and layering color upon color and glazing the finished skein produces some of my favorite yarn.  This is a great approach for a novice dyer to use.  Putting on layers of color and glazing will give you a lot of insight into how dye works on yarn.

Purp
The skein on the left is the product of several dye baths, which gave it pale undertones shining through a rich blue-puple.  The skein on the right has been glazed in a deep purple, which gives it a completely different look.  You would not likely guess that the two skeins started life looking the same.

Yellowglaze

In this next case, the skein on the left is dyed a sunny yellow-orange colorway.  Unlike our example above where the glaze was a darker color in the same family, the skein on the right was glazed in a reddish brown.  This focused on the color variation in the original skein and produced a mellowed brown skein with organic color changes.

Glazing can also be done in lighter colors, or, more sparingly in black.  The secret to glazing is to work with dye that will strike immediately and stay where it is placed.  Some dyers work with a dry skein to maximize this effect.  I typically work with a very hot dye bath and mordanted yarn, along with a damp but not wet, skein.  Whatever the method, and as with anything else to do with dyeing color and fiber there are a multitude of way to produce beautiful results, dyeing and overdyeing skeins is a great method for both beginning and more advanced dyers to use.

woocommerce-placeholder

Baby Camel Yarn

Any yarn dyer will tell you: it's an addiction.  On a beautiful, sunny, Saturday morning, dyers will jump out of bed and get to work.

Oldbricks2

Even though dyeing yarn to sell at the moment, my desire to dye yarn has never disappeared.  And I've had a lot of freedom to experiment with yarns, colors and processes.  One of my early experiments was with some ridiculously expensive but incredibly soft and beautiful Baby Camel yarn, in an 8-ply aran weight.  I loved the yarn, which I dyed up in baby sweater skein quantities for myself.  It's delightful.

I've been happily knitting an Antler Sweater from this yarn, so I was excited last night, when I went to pull some summer clothes out of my cedar closet, and realized there was a box of yarn I had dyed for myself tucked behind them.  (I feel horrible for my children — I have more stash than I can knit with in this life, and I know that after I die, they will be stuck having one of those horrible estate sales and trying not to laugh at the huge quantity of yarn I dyed for myself but never got around to knitting).  My favorite colorway in the box is this:

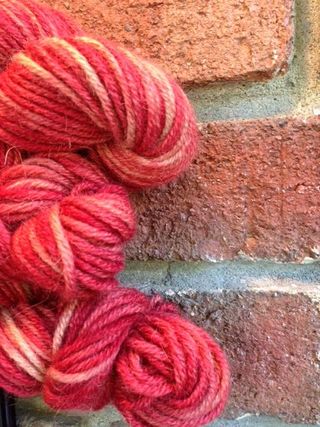
Oldbricks

The colorway is Old Brick, dyed on Baby Camel yarn.  What a fantastic surprise to rediscover it, along with all of it's other "friends" in the box.  Even if I never get around to knitting with all of them, it's nice just to fondly pet them and look them over.  Sometimes, a dyer just has to dye.  That seems to be the case for me, especially in summer, with perfect weather and lots of inspiration!

woocommerce-placeholder

In Defense of Single Skein Projects — Why We Knit

We can't all be the girl who knits incredibly intricate Estonian lace in her spare time, producing immaculate shawls of haunting beauty.  And we shouldn't feel bad about it.

Redeux

I love knitters who are accomplished and precise, and I enjoy celebrating their work.  But that doesn't, and shouldn't, in any sense take away from the accomplishments of new knitters, intermittent knitters, or knitters without time for larger projects.  There is virtue and integrity too in smaller, simpler, single skein projects.

My Redeux hat, pictured above, was a relentlessly simple knit that any beginner could finish in a day or two since it calls for a single skein of bulky yarn.  It has given me an enormous amount of pleasure, to say nothing of the warmth it leant my husband during our trip to Iceland.  It was easy, it was simple and it is red and beautiful.  I value this hat as much as any project I've ever knit.

Twisty

Similarly, this Rainbow Twist Cowl is easy enough to be the perfect first attempt at cables for a knitter who has never done them before.  Plus, it has the advantage of color.  Anything knit with Malabrigo's beautiful Arco Iris colorway is guaranteed to become a cherished favorite.  Again, a quick simple knit that was infinitely satisfying and produced a remarkable result.  I know this to be true because my teenage daughter stole it away as soon as it came off of my needles and will not return it.  This must mean it is a thing of grace and beauty.

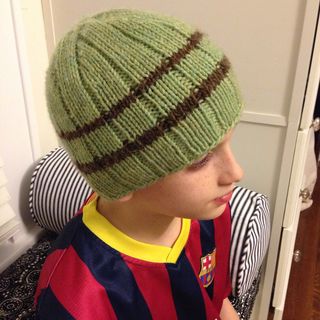
Ollie hat

This is a basic ribbed knit hat, Rib-a-Roni, knit from a single skein with the addition of a few leftover scraps to form the stripes.  This hat brought me such a feeling of accomplishment.  I googled and mastered jogless stripes so that the joins look even.  The ribbing was meditative.  The recipient was ecstatic.  He is still wearing it in summer.

We all know that as knitters, there is a tremedous amount of pressure to constantly innovate our craft. And I like that.  Last year I picked up lacework for the first time and enjoyed the results. But there is a special virtue, and no shame in working with these easier, baby-bite sized kind of one-skein projects.  They take skill too.  We sometimes forget that to non-knitters, we all look like rocket scientists. Don't be afraid to turn off the pressure and enjoy a simple knit.