woocommerce-placeholder

Dyeing Yarn with Natural Dyes. Part Two.

This is Part Two of my tutorial on dyeing yarn with black beans.  Take a look at the preceding post to see the steps involved in preparation of the dyepot and the mordanting the yarn.  

We're at the stage where we are reading to dye the yarn.  Remove the beans from the liquid and skim any foam that has accumulated of the top of the liquid, the pour it into your dyeing vat. 

Photo 12

Here is our bean bath, all ready to go.  You'll notice that it is pinkish — dripping some of the color onto paper towels gives you an even better idea of what you can expect from the dyepot.

Photo 14

Since this looked a bit on the pinkish side, and I wanted to bring out the blue-green tones in the dye, I mixed a solution of soda ash and water to use in the dyebath.

Photo 13

First, I gently immersed the yarn in the dyepot.  If you want even color, you could gently move the liquid through the skeins for even coverage.  But because I wanted some light variegation, I carefully placed the skeins in the pot and ensured they were covered, but made no effort to distribute the dye.  I've got all three skeins of yarn in this one pot.

Photo 16

In a bit of dyeing magic, I poured the soda ash solution over the top of the pot and there was an instant color transition.  That process continued as the yarn soaked over the next 12 hours.

Photo 22

Here we are at the end of the dye bath, ready for removal and rinsing.

Photo 19

I very gently rinse the yarn, and then soak it in successive baths until the liquid is completely clear.  Three baths did it for this yarn, but I did a final soak in synthrapol, a dyers' soap that removes any loose dye molecules at the end of the process, before reconditioning the yarn.

Photo 23

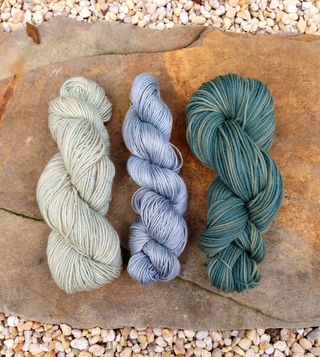
Here are my three skeins, hanging for a final bit of sun after resekeining.  

Photo 27

The skein on the left is the Malabrigo.  It's a pale green, the yarn has more color than the photo.  The middle skein is the Panda silk/bamboo blend and the skein on the right is the Pixie superwash wool. Dyeing is always a subjective process, influenced by a lot of external conditions like temperature, water ph, and concentration of dye.  But in natural dyeing, the results seem to be even more variable and very exciting.  I can't wait to knit with these skeins!

Natural dyes are notoriously migrant, meaning that the dye can fade with exposure to light and washing over time.  These skeins were well mordanted, but I'm going to do a little bit of experimentation with their light and color-fast properties to see how they do.  I hope you'll try some natural dyeing too.  Please let me know if you try it and what your results are like.  You really can't go wrong.

woocommerce-placeholder

Dyeing Yarn with Natural Dyes. Part One.

Photo 27

You will never guess.  What natural dyestuff do you think I dyed these yarns with?  It's definitely not an obvious choice, unless you've done this before, but all three of these skeins were dyed in a vat prepared from black beans.

Photo 2

Here they are, soaking in the kitchen.  I use a pot with a strainer so I don't have to fish all of the beans out after the "juice" is ready, and since this is nothing but black beans, I have none of the usual worries about working in the kitchen.  

I'll include tutorial notes on the steps I took, in case you want to dye along with me.  I eye-balled the amount of water I would need to cover my skeins, and after rinsing the dust off of the beans, covered them in water, stirred them up, and left them to soak. This batch soaked for about two and one-half days.

Photo 4

The day before I wanted to dye my yarn, I pulled it out to mordant.  The mordanting process makes it possible for the dye molecules to stick to the yarn molecules, much as in commercial wool dyeing where citric acid is used in the process.  There are a number of mordants available for use with natural dyes. Here, I'm using aluminum sulfate, which, although considered safe, means we're back to using designated dye pots and a mask for mixing.

Photo 5

We're using skeins of three different yarn bases here, because natural dyeing produces fascinating and often unpredictable results on different fibers.  On the left is a skein of Elliebelly Pixie Superwash Merino.  The middle skein is Elliebelly Panda, a 50/50 silk bamboo mix.  The final skein is undyed Malabrigo Mecha, which is a single-ply Merino, that is not superwash.

Photo 7

Here they are in the mordanting bath, with 5 tablespoons of Alum and a tablespoon of kitchen grade Cream of Tartar, which acts as a mordant/brightener.  I take close to an hour to bring the submerged yarn to a temperature where the yarn is not quite simmering.  Then, lid on but off the stove, the pot sits until the yarn is completely cool before going into the dyepot.  This is particularly important in this case, as dyeing with black beans is a cold process, and the colors gray out if heat is applied.

Photo 10

Remember to use your stove fan if dyeing in the kitchen. (With thanks to my husband for the lovely magnet that graces the hood of our stove).

Tomorrow, we'll walk through the dye bath and admire the finished yarn in Part Two.