woocommerce-placeholder

Knitting The Cables And Lace Capelet

14 - 2

I finished up my Cashmere Gadabout last night.  It's blocking and there will be photos later on this week. Once it was drying, I picked back up with my Cables and Lace Capelet, which has been languishing for weeks while Christmas knitting got finished.  And I'm so glad that I did!  This project has a lot of virtues.

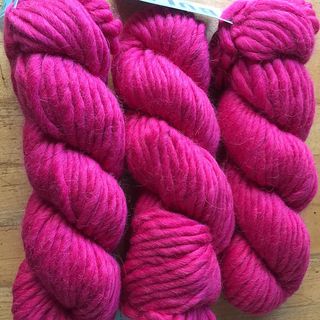
First is the yarn.  I love Madeline Tosh.  Sometimes, I cherish her skeins so much I become hesitant to knit with them while waiting to find the perfect pattern.  But this yarn, her Super Bulky ASAP in the Weathered Frame colorway, was ordered just for this pattern and went straight onto my needles when it arrived. 

The second virtue of this pattern is that the yarn knits up fast and pretty in the super bulky weight.  I'm not a huge fan of knitting on large needles, and the size 11s are at the outer edge of comfortable knitting for me, but still within it.  And overall, they are worth dealing with because it is so stinking fun to watch this pattern take shape, so quickly.

The third virtue is that it is making me feel very accomplished.  If you've looked at this pattern before you know that you knit the bottom band and then, after grafting the ends together, pick up stitches to knit the body of the capelet.  I'm notorious for avoiding picking up stitches, but have been gently encouraging myself to do so over my last few projects.  I'm happy I've been doing that, as last night, I picked up the 133 stitches around the edges of the band without a hitch and went onto the lace.  Success!

My gauge is good, even in the round.  But I'm aware of pattern notes that say this project comes out too small for an adult, even though the sample project is beautiful and clearly adult sized.  It's difficult to get a sense with it all bunched up on the needles, but I'll likely take it off on some waste yarn once I get a foot into the body to get a sense of whether I need to make some adjustment.  Hopefully once finished, my notes on sizing will help anyone who wants to knit this down the road to get a sense of how it fits.  It's such a beautiful project and this is an ideal yarn.
woocommerce-placeholder

Knitting Gadabout

My Gadabout cowl started out as an experiment.  I had some aran weight Debbie Bliss cashmere yarn in a natural color, leftover from a hat I knitted years ago.  I had just under 300 yards of it left and it was so soft that I wanted to knit something to wrap around my neck.

image from images4-d.ravelrycache.com

So I dyed it blue and went off in search of a pattern.  I swatched for a simple scarf, but didn't think the yarn had enough structure. I tried a Black Death shawlette.  It was a great pattern, but I wasn't feeling the love.  Then I saw , cowlThe Plucky Knitter's Gadabout and fell instantly in love.  I adore cables, and these are clever but simple to knit.  Best of all, you can memorize the pattern during the first 16 row repeat, making this the perfect portable knitting project.

Gadabout

This is a pattern that whispers to you "just one more repeat, your bed will wait."  It's almost impossible to put down.  

I'm about half way finished — my six 50 gram skeins limit how large I can make it.  The pattern itself has three panels of cables running up its length, but I wisely cut back to two out of fear of yardage and think this should work, as my gauge indicates I'll still be as wide as the pattern calls for, given the bulk of my yarn.

I love this pattern, and let's face it, I live for cashmere.  This is one of those rare patterns I feel sure I'll knit a second time.  If you're looking for something to cast on for this new year, this is it!


woocommerce-placeholder

Hanukkah, Knitting and Elliebelly Yarn

What would the first night of Hannukah be without gifts? Specifically, yarn. Because what else does a knitter want for the holidays?

Image

Every Tuesday on the Elliebelly knitting group on Ravelry, we post on our Take A Picture Tuesday thread and share what we're working on. All projects are welcome, no matter what yarn you're knitting with. Since the first night of Hanukkah this year coincides with our Take a Picture Tuesday thread, this week, I will do a few random drawings to send Yarny Hanukkah gifts to posters next Tuesday.

So come post your works in progress or even your works on hold. Post a picture of yarn you haven't cast on yet and what you're thinking about knitting with it. Or post your recent swatching.

The holidays give us a chance to be our best selves and knitting is definitely a part of that for me. Invite your friends to our party and post up all the Yarny goodness for inspiration, motivation and just plain fun. We can't have dreidles and latkes on line, but there will be yarn!

Hanukkah, Knitting and Elliebelly Yarn

woocommerce-placeholder

Bad Things Happen When I Go Away

I should have known it was going to be a bad trip, right?  For openers, within minutes of my getting on the first plane, husband sends a series of photos that demonstrate that my months of careful training of the puppy are all going out the window.  Immediately.

Figtable2

He taunted me with photos all week: dog on table, dog on bed, dog in the trash.  I should have known it was going to be a really bad week.  And it was, at least in a knitting way, because this is the last photo we're every going to see of my Ferryboat Mitts, knit in my beloved Plucky Knitter Trusty yarn in Corduroy.

Cordmitts

I finished the first mitt and started on the second the night before I left, hence the fabulously bad hotel room lighting photo.  But they were lovely.  I couldn't stop trying them on in progress.

IMG_2436 (1)

(Airplane lighting, even worse than hotel room lighting).  

I answered a work-related call in the Atlanta airport as my flight home was boarding.  Typically, I would have had better sense than to combine those two, but it was an important call.  By the time I sat down on the plane, I realized I didn't have my knitting.  A kind stewardess told me I had time to run back and get it. The gate agent wouldn't let me off, but said she would go get it.  Predictably, she came back 30 seconds later, telling me it wasn't there and that I had to get on the plane.

Despite the efforts of some kind Ravelers and other friends to track it down, my knitting is nowhere to be found.  So RIP wonderful mitts that would have kept me warm, along with my favorite copper stitch markers.  Somewhere around gate T3 in the Atlanta airport, my knitting is cold and lonely.  I feel sure it misses me.  And I feel really sad.

woocommerce-placeholder

Outlander Knitting and The Polar Vortex

With rumors of another polar vortex-like episode of cold weather headed for the deep south, I decided I needed a quick, but densely warm cowl, to get me through the next few weeks.  I've knit several cowls that mimic the look of Claire's  beautiful Sassenach cowl, as she works her way through the Scottish Highlands in the Outlander series, and I decided a modified version would be just right.

Bluecowl

This pattern is so easy that I knit it during a drive yesterday (I was obviously a rider, not the driver), and had it ready to wear by evening.  The yarn is Bulky Blue Sky Alpaca and I held it double-stranded.  I used three skeins of yarn for this cowl, dividing the last skein into two even parts.  The pattern is very simple: Using size 35 needles, Cast on 16 stitches using your favorite provisional cast on (I like Lucy Neatby's, using a crochet hook, which you can see here).  Knit in garter stitch, i.e. knit every row, until you are almost out of yarn.  You will finish the scarf with Kitchener stitch, for a seamless join.  To do this, you need one length of yarn (no double stranding for this part), that is three times the width of your work. Even if you don't like to Kitchener, you can manage it for 16 stitches, and the result will be well-worth it.

For the larger cowl worn by claire — one that is long enough to twist around your neck a couple of times or spread out along your shoulders, you will want a longer cowl than this one.  The modification is simple — this cowl is very bulky because of the double stranding, but using the same quantity of yarn, held single, you can produce a longer cowl that is easily wrapped around your neck.  

Bluecowlyarn

Finally, a word about the yarn.  Recently, I overdyed a sport weight Blue Sky yarn in this same pink colorway for a friend, and got a lusterous result.  That yarn had silk in it, and I thought that might be responsible for the sheen of the yarn.  I was curious as to whether I could replicate the result in a yarn that lacked the silk content.  I tried it with this bulky yarn that is 50% Alpaca and 50% wool and you can see the result in the picture at the top — it's a deep, shimmering blue.  I'm as pleased with the cowl as I am with the yarn, and look forward to staying warm through out the coming weather event.

woocommerce-placeholder

Dyeing Yarn with Natural Dyes. Part Two.

This is Part Two of my tutorial on dyeing yarn with black beans.  Take a look at the preceding post to see the steps involved in preparation of the dyepot and the mordanting the yarn.  

We're at the stage where we are reading to dye the yarn.  Remove the beans from the liquid and skim any foam that has accumulated of the top of the liquid, the pour it into your dyeing vat. 

Photo 12

Here is our bean bath, all ready to go.  You'll notice that it is pinkish — dripping some of the color onto paper towels gives you an even better idea of what you can expect from the dyepot.

Photo 14

Since this looked a bit on the pinkish side, and I wanted to bring out the blue-green tones in the dye, I mixed a solution of soda ash and water to use in the dyebath.

Photo 13

First, I gently immersed the yarn in the dyepot.  If you want even color, you could gently move the liquid through the skeins for even coverage.  But because I wanted some light variegation, I carefully placed the skeins in the pot and ensured they were covered, but made no effort to distribute the dye.  I've got all three skeins of yarn in this one pot.

Photo 16

In a bit of dyeing magic, I poured the soda ash solution over the top of the pot and there was an instant color transition.  That process continued as the yarn soaked over the next 12 hours.

Photo 22

Here we are at the end of the dye bath, ready for removal and rinsing.

Photo 19

I very gently rinse the yarn, and then soak it in successive baths until the liquid is completely clear.  Three baths did it for this yarn, but I did a final soak in synthrapol, a dyers' soap that removes any loose dye molecules at the end of the process, before reconditioning the yarn.

Photo 23

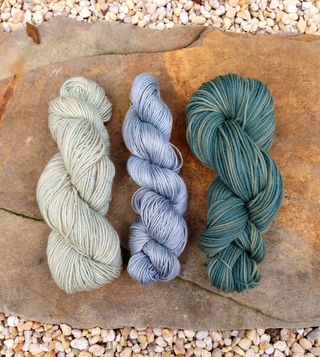
Here are my three skeins, hanging for a final bit of sun after resekeining.  

Photo 27

The skein on the left is the Malabrigo.  It's a pale green, the yarn has more color than the photo.  The middle skein is the Panda silk/bamboo blend and the skein on the right is the Pixie superwash wool. Dyeing is always a subjective process, influenced by a lot of external conditions like temperature, water ph, and concentration of dye.  But in natural dyeing, the results seem to be even more variable and very exciting.  I can't wait to knit with these skeins!

Natural dyes are notoriously migrant, meaning that the dye can fade with exposure to light and washing over time.  These skeins were well mordanted, but I'm going to do a little bit of experimentation with their light and color-fast properties to see how they do.  I hope you'll try some natural dyeing too.  Please let me know if you try it and what your results are like.  You really can't go wrong.

woocommerce-placeholder

Dyeing Yarn with Natural Dyes. Part One.

Photo 27

You will never guess.  What natural dyestuff do you think I dyed these yarns with?  It's definitely not an obvious choice, unless you've done this before, but all three of these skeins were dyed in a vat prepared from black beans.

Photo 2

Here they are, soaking in the kitchen.  I use a pot with a strainer so I don't have to fish all of the beans out after the "juice" is ready, and since this is nothing but black beans, I have none of the usual worries about working in the kitchen.  

I'll include tutorial notes on the steps I took, in case you want to dye along with me.  I eye-balled the amount of water I would need to cover my skeins, and after rinsing the dust off of the beans, covered them in water, stirred them up, and left them to soak. This batch soaked for about two and one-half days.

Photo 4

The day before I wanted to dye my yarn, I pulled it out to mordant.  The mordanting process makes it possible for the dye molecules to stick to the yarn molecules, much as in commercial wool dyeing where citric acid is used in the process.  There are a number of mordants available for use with natural dyes. Here, I'm using aluminum sulfate, which, although considered safe, means we're back to using designated dye pots and a mask for mixing.

Photo 5

We're using skeins of three different yarn bases here, because natural dyeing produces fascinating and often unpredictable results on different fibers.  On the left is a skein of Elliebelly Pixie Superwash Merino.  The middle skein is Elliebelly Panda, a 50/50 silk bamboo mix.  The final skein is undyed Malabrigo Mecha, which is a single-ply Merino, that is not superwash.

Photo 7

Here they are in the mordanting bath, with 5 tablespoons of Alum and a tablespoon of kitchen grade Cream of Tartar, which acts as a mordant/brightener.  I take close to an hour to bring the submerged yarn to a temperature where the yarn is not quite simmering.  Then, lid on but off the stove, the pot sits until the yarn is completely cool before going into the dyepot.  This is particularly important in this case, as dyeing with black beans is a cold process, and the colors gray out if heat is applied.

Photo 10

Remember to use your stove fan if dyeing in the kitchen. (With thanks to my husband for the lovely magnet that graces the hood of our stove).

Tomorrow, we'll walk through the dye bath and admire the finished yarn in Part Two.